
Today we painted our 4 year old’s bedroom wall. She now has a beautiful rainbow themed bedroom, and I am in LOVE with how it turned out!
When we moved into our new house, we immediately knew we’d be letting our daughter pick the paint color for her room.
There is something so wonderful about including children in decisions like these, and with something like paint- well, it’s just paint.
It really doesn’t matter what color her room is. What matters is that she loves her bedroom, because it’s her space.
We talked colors and design from the moment we moved in.
She wanted purple- her favorite color. And, she’d decided to add in olive green. She had very specific choices.
Anytime we were at the store, we’d let her wander through the pain aisle and collect paint samples.
When it finally got to be time to paint her room, I sat down with her and really talked about what she wanted.
She had decided on a wall painted in rainbow colors!
And so, we took her to Lowes and let her pick out her colors (we used Lowes Valspar Signature paint and primer).
She made FAST decisions!
In an effort to make sure she’d looked at all of her options, I showed her varying intensities and shades of each color of the rainbow.
She had already decided, however. Her first choices were truly the ones she wanted.
She’d gone with dark, bold colors – for each color of the rainbow.
I was a bit nervous about the dark colors, but I quickly remembered my dark red room when I was a child. My room was dark red on all 4 walls. It was fabulous. Thinking of that calmed my type A personality from taking over the decision making.
We came home with 6 paint colors, one for each color of the rainbow (well almost): Red Orange Yellow Green Teal and Purple. We got 1 quart of paint for each color.
We didn’t quite end up with ROYGBIV, but this science Mama was alright with that.
Next, it was time to design the wall.
Before we talk design here, I just want to say, that including our daughter in these design and color decisions was so wonderful.


Why You Should Let Your Child Choose Their Wall Color and Design
She has ownership of her rainbow themed bedroom wall
This is something she’s going to be so proud of. She picked the colors. She picked the design. She had this vision. She has the ownership.
You might be wondering how old she is. She’s 4.5 years old. She’s at that age where she wants to be involved and make decisions. It turned out to be the perfect age for this.
It was a family project
This project turned into something we did together as a family. We spent time figuring things out together. We supported our daughter. It became a fabulous project to do together and was really a fun activity for all of us.
She will love her room
We are big on teaching our daughter about independent play. There is something so valuable about children being able to entertain themselves, and work through boredom.
Every day, our 4 year old has 1 hour of room time. She spends this time in her room doing free play.
She already does a great job for room time, but having her room the way she wants it will increase her desire to be in there and she’ll be more likely to enjoy herself.
She will feel valued
Our daughter’s opinion matters. She is going to know that. She will remember that she got to be involved and decide that she was going to have a rainbow themed bedroom.
She will feel heard and valued and loved in a tangible way that she can hold on to.
The Rainbow Wall Design
We drew and drew and drew.
We have special “Mama Time” each day as a part of our daily routine.
Once we had the paint purchased, this special time each day was highly focused on getting a design in place so we could move forward with painting.
This special time is just her and I. Her little brother is napping, and we just spend some good quality time together. It’s lovely and it’s something we both look forward to each day.
Since we now had a project, we focused in on the project during this time.
We got out the markers and crayons and drew our ideas.
Since our daughter is 4 and couldn’t quite draw exactly what she wanted, I was doing most of the drawing just to get our vision actually on paper for her to visualize.
We drew rainbow stripes- horizontal and vertical.
We drew a wall of rainbow squares.
We drew wall of rainbow triangles.
We drew a wall with a huge purple framed rectangle that had rainbow stripes in the center.
We then talked about flowers. A garden.
And so the designs merged and we settled on pretty much everything coming together in one design.
She wanted it all. I wasn’t sure we had the skills to do it all and have it come out nicely, but I knew we’d figure it out and that whatever we did, she’d love.
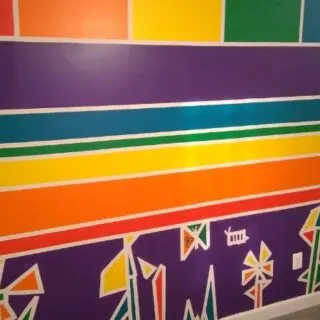
Our final rainbow wall design:
At the floor level there would be a large section of the wall painted her favorite color- purple.
On this purple section of the wall, we were going to put rainbow colored flowers.
Then, we’d have a section of horizontal stripes leading up to the ceiling- one for each color of the rainbow.
At the very top of the wall, there would be one final border. This border would be rainbow squares.
Getting the Rainbow Wall Ready
With our daughter’s vision in place and drawn out, we were ready to get the rainbow wall all taped out.
I taped the stripes, squares and basic sections so we’d have a good foundation.
Then, we taped out the flower design.


I did the first flower, and showed her what it would look like, and where the paint would go.
She was excited!
I then handed her a roll of tape, and we both put our ideas up on the wall together.
She needed help ripping the pieces, but it was amazing to watch everything that she did on her own!
She’d hold the tape roll up and pull out the size of tape she needed. I’d then rip it off for her. She’d tape it down.
She taped out two flowers and even included some grass blades. She did it all on her own.
I simply went back after and made sure each piece was connected so we’d have good lines. I had minimal work to do, however. She’d done a fantastic job!
I LOVED that she was so involved with this process. Her flowers were not perfect storybook flowers. But they were perfect because SHE’D designed them. And who are we kidding? My flowers were far from perfect as well! LOL
Painting the Rainbow Themed Bedroom Wall
Well, we had it ready. The wall was taped and ready for paint.
I put canvas drop cloths down to protect the floor. I opened up all of the paint cans. I had rollers and sponges ready (these sponges from amazon were perfect for the small design areas).
There was only one thing left to do- get painting!
We started with the garden portion of the wall, since it was easy for our daughter to reach and she was eager to get started.
I asked her if she had ideas for what colors she wanted where, or if she just wanted to have everyone start painting and just do whatever colors we wanted.
She told us she had “specific ideas”.
So, we went flower by flower, petal by petal with our daughter acting as supervisor. She took a sponge and marked each area with a specific color so we’d know what to paint where.


She loved it. She went down the whole wall marking her color selections and telling us what to do.
We then all grabbed a sponge and got to work!
We didn’t start painting until about 3:30 in the afternoon. (Perfect timing for when Daddy got home from work) haha!
We quickly realized that we were in for a long evening, so pizza was ordered!


I knew we needed to finish the wall all in one day, so we could pull the tape off while the paint was still slightly wet.
I’ve learned from past experiences, that pulling tape off once the paint is dry, can cause the paint to crack and lift up. So, we were on a mission to finish!
We had to take breaks to eat, take care of our 6 month old, etc. But the job got done and we all loved it SO much! This rainbow wall turned out amazing!
The Final Rainbow Themed Bedroom Wall:


Printable Instructions for Painting a Rainbow Themed Bedroom Wall:

How To Paint A Rainbow Themed Bedroom Wall
This is a fantastic DIY project to involve your child in.
Our 4 year old helped to design this rainbow themed bedroom wall, she picked out the paint colors all on her own, she helped tape the wall and paint the wall.
It was a fun family project and our daughter now loves her room!
Instructions
Choose Paint Color
Involve your child in picking out the color(s) he or she would like in their room.
Go to Lowes or Home Depot and let them collect paint samples.
Provide them with a maximum number to help guide the process.
Design the Wall
Draw pictures with your child using the colors they've chosen.
Talk about ideas with your child and try to bring their ideas to paper with them so you have a visual guide.
Don't worry about how "difficult" the design is. It will come out great no matter what in your child's eyes!
Prepare and Paint the Wall
- Tape the design on the wall WITH your child's help
- Place one sponge on the open lid of each paint color
- Have your child mark sections of the wall with the paint color they want in each section
- Paint the entire wall at one time (plan enough time to do this)
- Remove the tape as soon as you complete painting (this will prevent the edges of each section from chipping which can happen as the paint dries)
Notes
Involve your child as much as you can.
They can probably do more than you think. Let them try everything!
Yes, it will be an imperfect product.
Yes, it will be different than what you would have done.
Yes, your child will have a blast.
Yes, the final product will be perfect in your child's eyes.
Have fun and go with the flow. This more about the experience as it is the end design.
Recommended Products
As an Amazon Associate and member of other affiliate programs, I earn from qualifying purchases.
-
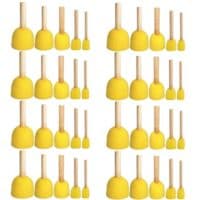
 WFPLUS 40pcs 5 Sizes Round Paint Foam Sponge Brush Set Kids Painting Tools Sponge Stippler Set for Painting Crafts and DIY
 -
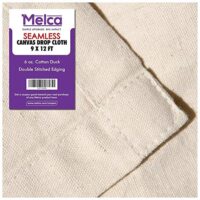
 Drop Cloth Tarp Art Supplies - 9x12 Finished Size, Seams Only On The Edges, New Unmarked Fabric, Cotton Duck Fabric - Be Confident You Have The Canvas You Need.
 -

 Finder Premium 4 Inch Mini Paint Roller Kit - Roller Frame With Roller Covers - 10 Pieces Tool for Home Repair and Professional Painting
 -
 Linzer RM4110 Plastic Tray Liner (10 Pack), White
 -

 3pk 1" x 60yd STIKK Blue Painters Tape 14 Day Easy Removal Trim Edge Finishing Masking Tape (.94 in 24MM) (3 Pack)